Inflatable Sample Evaluation: 15-Point Pre-Order QC Protocol
Every bulk order of commercial inflatables should start with a sample unit on your warehouse floor — not a glossy PDF spec sheet. The factory sample is the only chance you have to verify, with your own hands and a basic toolkit, that what comes off the production line matches what was quoted. A disciplined inflatable sample evaluation catches the differences between 1000D and 1100D tarpaulin, between 6 stitches per inch and 9, between a real UV coating and a marketing claim.
The protocol assumes you are evaluating a pre-production sample of a unit you intend to order in volume — typically a commercial bouncer sample where stitch density, anchor reinforcement, and air-hold matter most. Block out three to four hours, bring the toolkit listed at the bottom, and photograph every test result.
Material Quality (Points 1–5)
- PVC tarpaulin weight verification. Ask the factory for a 100×100 mm cutting from the same roll used on the sample. Weigh it on a digital scale accurate to 0.01 g. A 1000D tarpaulin should weigh approximately 0.55 kg/m² (5.5 g for the 100×100 cutting); a 1100D should weigh around 0.61 kg/m² (6.1 g). Anything more than 5% below target means the supplier substituted a lighter grade. For background on tarpaulin grades, see our PVC tarpaulin specification reference.
- Tensile strength field test. Take a corner offcut roughly 50 mm wide and pull it apart by hand with steady force. Quality 1000D+ tarpaulin will resist clean tearing and, if it finally separates, will show a clear scrim of polyester fibers between the two PVC layers. If it tears cleanly with little force or shows a thin, sparse scrim, the polyester base layer is undersized.
- Print quality and color fastness. Dampen a clean white cloth with a 30% isopropyl alcohol solution and rub a printed area firmly for 10 seconds. No pigment should transfer to the cloth. Any color bleed indicates surface-printed graphics that will fade within one season of UV exposure.
- UV-protective layer check. Look at the tarpaulin under bright light at a low angle. A genuine UV topcoat shows a uniform satin or matte sheen distinct from the base PVC. If the supplier claims a UV layer and the finish is identical to interior surfaces, the coating is either absent or applied too thinly to make a difference.
- Fire retardant certification documents. Request the original test report — not just a logo on a spec sheet. Acceptable standards include EN 71-2 (Europe), CPAI-84 (United States), or NFPA 701. Confirm the report is for the exact tarpaulin grade on your sample, dated within the last 24 months, and issued by a recognized lab such as SGS, Intertek, or TÜV.
Construction Quality (Points 6–10)
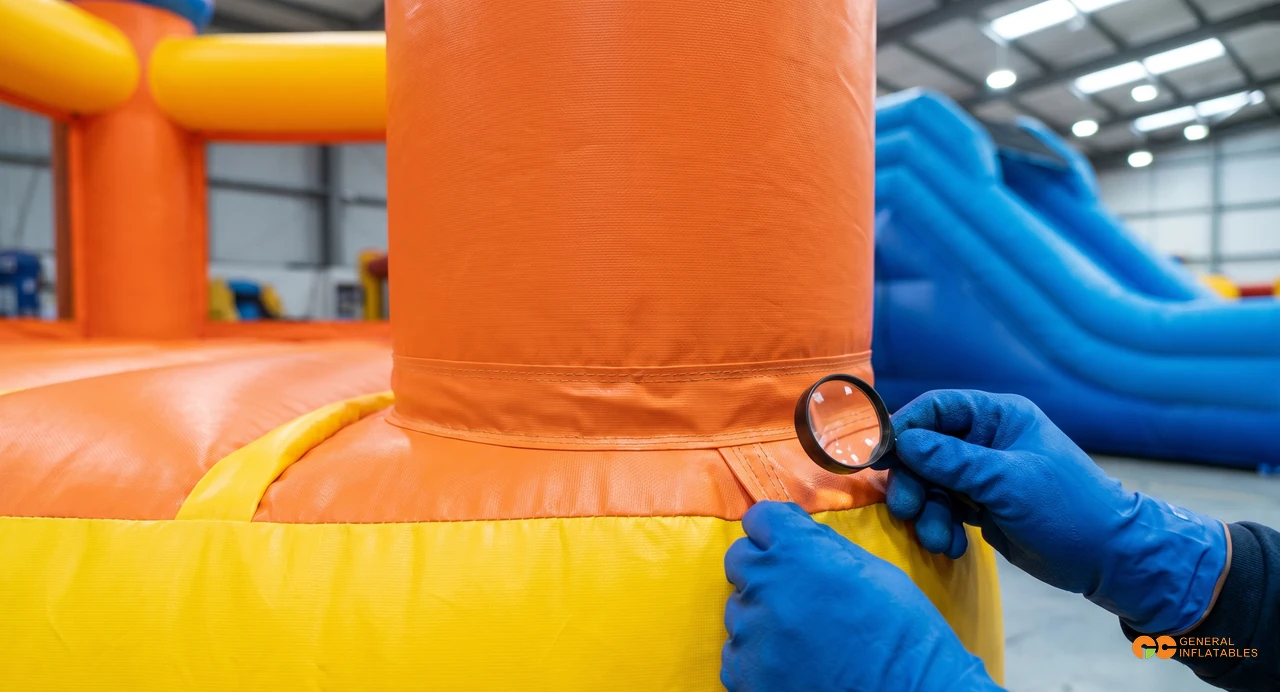
- Weld seam continuity. Run a fingertip along every welded seam on the deflated sample. You are feeling for skips, bubbles, gaps, or sections where the weld bead suddenly thins. High-frequency welding done correctly produces a uniform, slightly raised ridge. Any inconsistency is a future leak point.
- Stitch density on reinforcement points. Count stitches along a 25 mm (1 inch) section at every reinforcement strap. Target ≥8 stitches per inch using bonded polyester thread of 20 tex or heavier. Loose 5–6 SPI stitching with thin thread will fail at the first hard anchor pull in the field.
- Reinforcement patch placement. Confirm double-layer reinforcement patches at every corner, anchor D-ring, the base of every vertical column, and around every air valve. On slides, patches must wrap the top lip and base impact zone. Missing patches anywhere here is a design defect.
- Air valve quality. Spring-loaded inflation valves (Boston style) seal better than basic screw caps. Inflate the unit, press a fingertip on the closed valve, and watch for any whistle of escaping air. Repeat after deflating and re-inflating once — cheap valves often seal the first time and fail the second.
- Internal baffle inspection. Shine a flashlight through the largest inflation port while the unit is partially deflated. Internal baffles should be welded cleanly to floor and ceiling with no torn edges or sagging. Baffle failures are the most expensive field repair on a commercial inflatable.
Performance Tests (Points 11–15)
- Air-hold test. Fully inflate to the recommended pressure, mark a baseline on a pressure gauge or measure circumference at three fixed points, and leave the blower off for 24 hours in a temperature-stable room. A well-built commercial unit should lose less than 10% pressure in that window. Faster loss indicates a baffle pinhole or valve leak.
- Anchor strap pull test. Hook a 10 kg luggage scale to each anchor D-ring and pull laterally until the scale reads 10 kg, holding for 10 seconds. Watch the stitching and the patch under the strap. Any visible stretching of the patch, thread elongation, or seam slip means the anchor will fail in 30+ mph wind. Repeat on all anchors — sometimes one weak point is enough to lose the unit.
- Surface friction test on slides. Press a flat hand against the slide surface and pull it down at a moderate speed. A correctly finished slide tarpaulin glides smoothly with mild resistance. A sticky or grabby surface means residual mold release or unfinished PVC and will burn skin in real use. This test is especially critical for water slide samples, where surface seal and wet friction also need verification.
- Noise test of the included blower. Run the blower at normal operating speed and stand 1 m from the inlet with a decibel meter app on your phone. Target ≤70 dB at 1 m. Anything louder will draw complaints at corporate events and indoor venues, and usually indicates worn bearings or an unbalanced impeller.
- Folded weight and dimensions verification. Fold the unit per the factory's recommended pattern, weigh it on a luggage scale, and measure the folded footprint. Compare against the spec sheet. A ±5% tolerance is reasonable; anything beyond that means either the material is heavier than quoted (you pay more freight) or lighter than quoted (you got a thinner grade).
Tools You Need
- Digital scale accurate to 0.01 g (for the tarpaulin cutting)
- 10 kg luggage scale (for anchor pull tests)
- Tape measure, 5 m minimum
- Pressure gauge compatible with the blower outlet
- Flashlight (LED, 200+ lumens)
- Clean white cotton cloth and 30% isopropyl alcohol
- Decibel meter app (NIOSH SLM or equivalent)
- Smartphone for photo documentation
Many of these tools also double as ongoing field-service items once the units are in your rental fleet. If your QC kit is incomplete, see the inflatable accessories and QC tooling catalog for blowers, repair kits, and pressure gauges that match commercial specs.
What to Ask the Factory if a Point Fails
One or two failed points on a sample is not automatically a deal-breaker — it is a negotiation. The key is to demand a written remediation plan, not a verbal "we will fix it." Ask the factory to specify, in an email or signed addendum: which material or process will be changed, the new spec value (e.g., "1100D 0.61 kg/m² confirmed by mill certificate"), and the inspection step they will add on the production line to catch it. Verbal assurance from a sales rep does not bind the production manager.
Red Flags During Sample Evaluation
- Factory refuses any test on the sample, citing "it's just a demo unit"
- Won't provide a tarpaulin offcut for the weight and tear test
- Hides the production floor from your view, or only shows a polished showroom
- Cannot produce the original fire-retardant test report on request
- QC documents are unsigned or use a generic template with no factory letterhead
Any single red flag is a reason to slow down and ask harder questions. Two or more, and you should consider walking away — the factory either lacks process maturity or is hiding something. The prerequisite step to sample evaluation is verifying the manufacturer itself; if you have not yet done that, our manufacturer vetting checklist walks through the audit before you ever request a sample.
Documenting the Sample Evaluation
Treat the sample inspection as a formal QC event. Photograph every test result — the digital scale reading, the alcohol-rubbed cloth, the stitch close-up with a ruler, the decibel app screen. Print a 15-point checklist, mark each point pass/fail with measured values, and have the factory's QC manager sign and date it. That signed checklist becomes part of the purchase agreement: if the bulk units fail any point that the sample passed, you have written evidence to support a remediation claim or chargeback.
A disciplined sample evaluation turns a vague "the sample looked good" conversation into a documented quality baseline — the cheapest insurance against a bulk-order quality dispute six months later.
Ready to evaluate samples from a verified manufacturer?
We deliver pre-shipment samples with a documented 15-point QC checklist signed by our factory QC team — so the field tests on your end confirm rather than discover quality. Browse our inflatable castle catalog and request a free pre-purchase sample evaluation pack.