
"It's losing air" is a symptom, not a diagnosis, and treating it as one wastes repair budget on the wrong fix. A unit losing pressure overnight could have a pinhole leak, a failing valve, a separating seam, or normal thermal contraction that isn't actually a problem at all. This guide covers how to actually identify which one you're dealing with before reaching for a patch kit or a replacement quote.
Air contracts as temperature drops, and a unit that feels noticeably softer on a cold morning than it did at the warm end of the previous day is often experiencing normal thermal pressure loss, not a leak. Before diagnosing a leak, check whether the pressure loss correlates with a temperature drop rather than occurring at a constant rate regardless of conditions — a true leak loses pressure continuously, while thermal contraction stabilizes once temperature does.
Once you've confirmed a real leak, the standard diagnostic method is a diluted soap solution sprayed or brushed across the suspect area with the unit at normal operating pressure — escaping air produces visible bubbles at the exact leak point. Work systematically across seams, around any fittings or valve housings, and across flat panel areas rather than assuming the leak is at an obvious stress point, since small pinhole leaks in the middle of a panel are easy to miss without a full systematic pass.
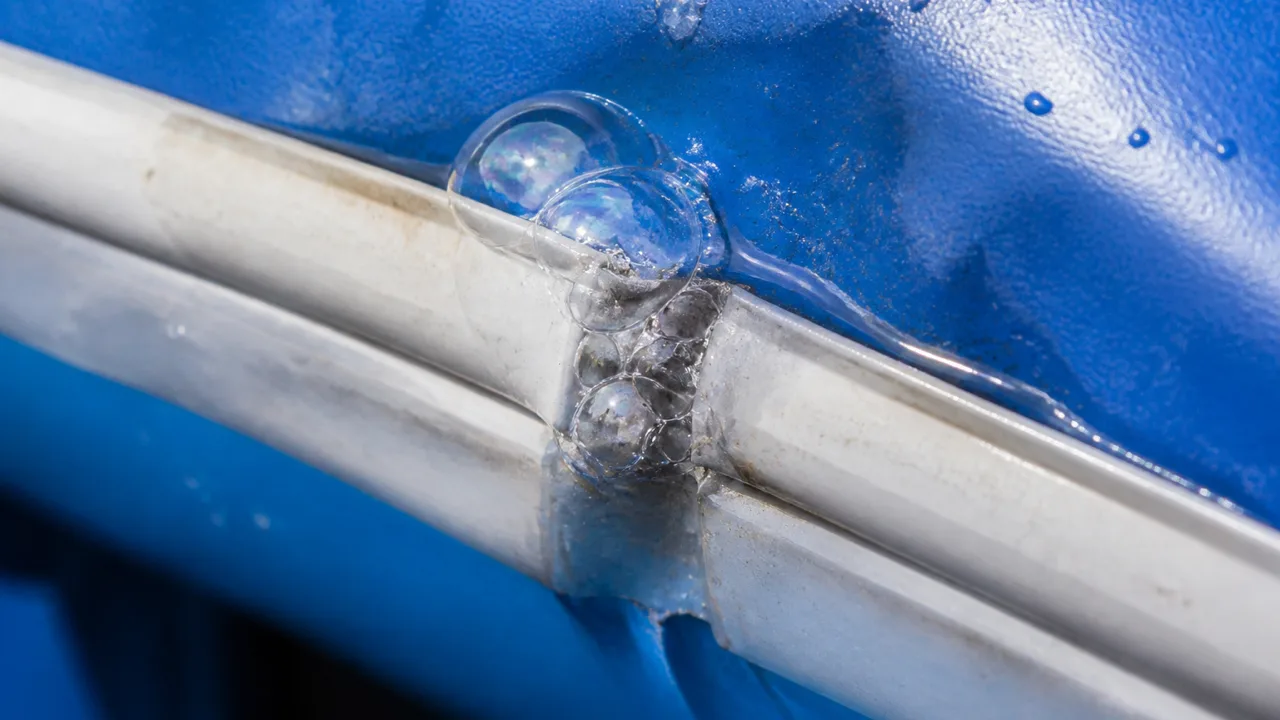
A seam failure shows bubbles concentrated along the welded or sewn seam line itself, often starting small and lengthening over time as stress continues to work the weakened point — this is a structural failure of the bond between panels, not the material itself. Material porosity or a pinhole leak shows bubbles at a single point away from any seam, typically from a puncture, abrasion, or a manufacturing defect in the PVC coating itself. The distinction matters because a seam failure often indicates the surrounding seam is also under stress and may fail again nearby even after a successful patch, while a single pinhole away from a seam is usually an isolated event.
Zippers deserve separate treatment from seams and valves because they're a mechanical seal rather than a welded or glued bond — run your hand along the full zipper length while the unit is inflated and listen for a hiss, or apply the same soap-water test directly along the zipper teeth. A zipper leak generally means the zipper itself needs replacement or the storage flap covering it needs re-securing; unlike a seam, a worn zipper rarely reseals on its own, and treating a zipper leak as if it were a seam failure leads to patching fabric next to a zipper that continues leaking regardless.
If the soap test shows no leaks across the body but the unit still loses pressure, check the valve itself next. Common valve failure signs: a visible tear or crack in the valve flap or gasket, debris or grit lodged in the seal preventing full closure, or a valve that doesn't hold pressure when tested independently by inflating just past the valve and checking for immediate loss. Valve failures are often the easiest and cheapest fix in this diagnostic chain, since most commercial units use a replaceable valve assembly rather than a bonded one, but they're also the most commonly overlooked since operators tend to assume a body leak by default.
Before repairing, photograph and log the leak location, type (seam, valve, pinhole), and any pattern across recent incidents on the same unit. This record does two things: it helps a repair technician or your supplier diagnose faster on a warranty or repeat-issue conversation, and it builds the failure history that feeds into an eventual repair-vs-replace decision for that specific unit rather than a generic age-based estimate. Once you've confirmed the leak type, our repair kit guide for long-distance operators covers what to stock and how to execute the fix itself, and our commercial inflatable range is worth reviewing if this diagnosis points toward replacement rather than repair.
This guide covers identifying what's actually failing, not whether to fix it or retire the unit — that's a separate decision involving unit age, repair cost, and remaining useful life, covered in our repair vs replace decision matrix for aging commercial inflatables. It also doesn't cover pre-delivery quality inspection — if you're checking a newly delivered unit rather than diagnosing an in-service failure, our defect and quality checkpoint guide covers that separate process.
How do I find a small leak that isn't obvious?
Use a diluted soap solution across the entire unit at normal operating pressure, working systematically across seams, fittings, and flat panels — escaping air produces visible bubbles at the exact leak point, including pinhole leaks too small to feel or hear.
Is a leak near a seam always a seam failure?
Not necessarily — a pinhole leak can occur near a seam by coincidence. Check whether the bubbles concentrate along the seam line itself (seam failure) or at a single point that happens to be nearby (isolated pinhole), since the repair approach differs between the two.
If you're seeing repeated leaks across an aging fleet and want help deciding between continued repair and replacement, our team can walk through the decision framework for your specific units.