Every commercial inflatable crew eventually faces a site that breaks the standard anchor plan. A beach activation cannot use the same stakes as a park festival. A rooftop bar cannot drill into a membrane roof. The anchoring system is the single most important variable separating a safe event from a liability claim, and the correct choice depends on what is under the unit's footprint. This guide extends the foundational anchor knowledge in our commercial inflatable anchor systems overview with terrain-specific hardware, install methods, and wind limits for the five site types operators meet most often.
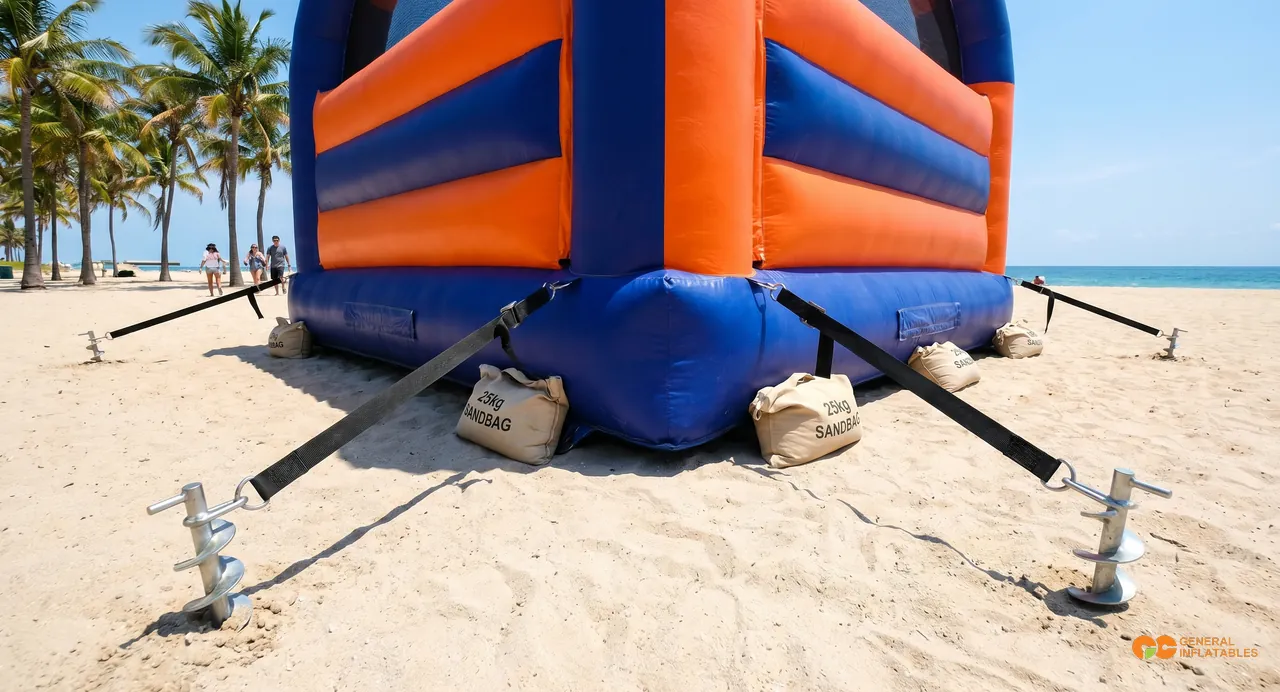
Recommended system: corkscrew sand anchors (40–60 cm length) paired with sandbag weighted skirts around the perimeter.
Hardware spec: 12 mm diameter spiral shaft, galvanized or zinc-plated, with a welded top eye rated to 800 kg pull. Minimum embedment depth 50 cm for wind speeds up to 15 m/s; step up to 60 cm spirals if forecast gusts approach 18 m/s.
Installation: drive the spiral perpendicular to the surface — not angled — so the helix bites the full vertical column of sand. After seating, top up loose sand around the skirt and tamp it. Beach bouncers from our commercial bouncer catalog ship with anchor packs sized to their footprint, but the operator must still confirm sand depth on site.
Wind tolerance: 15–18 m/s with a full sandbag perimeter and 50 cm spirals. Drop the ceiling to 12 m/s if the sand is dry, loose, and uncompacted.
Common mistakes: relying on sandbags alone (sand shifts under load and the bags walk outward); shallow spirals under 30 cm (pull straight out in 10 m/s gusts); leaving spirals in direct sun for hours before install (hot sand expands the metal and bonds it to the shaft, making removal nearly impossible without damage).
Recommended system: steel ground stakes (50–75 cm length) with cross-bracing tie-offs and supplemental water ballast bags at corner load points.
Hardware spec: 16 mm diameter forged steel, T-handle or hook top, painted or galvanized. Each stake should be rated for at least 1,000 kg pullout in firm sod.
Installation: drive stakes at a 45° angle leaning away from the inflatable — this orientation converts the wind's lateral pull into a wedging force that tightens the stake rather than levering it out. Pre-test the ground with a pilot hole at each anchor point; if the pilot rod meets a hollow void or hits a hard refusal at under 20 cm, relocate.
Wind tolerance: 12–15 m/s on dry, firm sod with full stake count. Drop to 10–12 m/s on rain-softened ground, and re-tension every 60 minutes because soaked soil continues to give under sustained pull.
Common mistakes: driving stakes vertically (they only resist downward force, not the lateral and uplift loads wind creates); skipping the call to the venue about buried irrigation and low-voltage cable (a punctured main mid-event ends the booking and the deposit).
Recommended system: weighted anchor pads using drum-style water tanks (100–200 L) or stacked ballast plates. Never drill, never stake.
Hardware spec: 100 L of water ballast equals roughly 100 kg per anchor point. Distribute across 4–6 points minimum for units up to 50 m² footprint; scale linearly above that. Use anchor pads with non-slip rubber bases (3–5 mm thick) between the ballast and the surface.
Installation: position empty drums or plates at each tether point before inflating the unit, then fill drums on-site from a hose. Filled drums are difficult to reposition. Advertising inflatables and rooftop dancers from our promotional inflatables range almost always end up on concrete plazas or membrane rooftops, where this no-drill rule is non-negotiable.
Wind tolerance: 12–15 m/s when ballast count meets the manufacturer's per-unit spec sheet. Halve the wind ceiling if you are under-counting anchor points.
Common mistakes: under-counting anchor points (working rule: one anchor per 5 m² of footprint as a floor, more for tall or sail-shaped units); substituting sandbags for hard-surface ballast (sandbags slip across smooth concrete under lateral wind load and offer almost no friction once wet).
Recommended system: wide-footprint sandbags combined with corner T-rings screwed into perimeter structural rails (not handrails). Water units on pool decks need extra ballast to counter splash-out weight loss — the same logic applies to the water games and slides we manufacture, which can lose 50–100 kg of effective ballast as guests displace water during peak use.
Hardware spec: 10 kg sandbags with a 30 × 30 cm flat base (avoid round tube bags that roll on smooth decking). T-rings should mount on 4-screw plates using 50 mm wood screws into solid framing — not into decking boards alone.
Installation: never stake through decking. Stakes split wood, void deck warranties, and create slip hazards from raised screw heads or splinters. Identify the structural rim joist or rail post first, then tie off to that load path. On wet pool decks, place grip mats under all ballast.
Wind tolerance: 10–12 m/s. The ceiling is lower than ground anchoring because decking flexes under load, transferring shock into the inflatable's tether points instead of damping it into the earth.
Common mistakes: tying off to handrails (designed for roughly 80 kg of lateral human load, not sustained wind force on a 30 m² sail); placing ballast on wet pool decks without grip mats (the bag slides, the unit walks, tension drops to zero).
Recommended system: asymmetric anchor distribution with uphill bias and extra reinforcement on the downhill corners. Mix stakes and ballast based on what the substrate allows.
Hardware spec: 1.5× the standard anchor count for any slope greater than 5%. For example, a unit normally needing 6 anchors on flat ground requires at least 9 on a 7% grade. Downhill corners take double-stake or double-ballast.
Installation: orient the inflatable so its shortest axis runs perpendicular to the fall line — this minimizes the lever arm wind has to work with as it rolls downhill. Confirm drainage paths before setup and route them away from anchor points.
Wind tolerance: reduce the flat-ground equivalent by 20%. A unit rated for 15 m/s on level grass should be capped at 12 m/s on a 6% slope.
Common mistakes: ignoring drainage (water pools downhill, softens soil around the most loaded anchors, and accelerates pullout); attempting operation on grades over 10° (the unit cannot be safely tested or evacuated and most insurance policies exclude operation at that incline).
Anchors are not a set-and-forget install. Build the following into every event SOP:
Many sites are not uniform. A unit straddling a grass-to-concrete transition needs bridging anchors: stakes on the grass side, ballast drums on the concrete side, with tether geometry adjusted so neither side bears more than its fair share. Treat the weaker substrate as the limiting factor for the whole unit's wind ceiling.
Every operator needs a hard stop in writing. The defaults below are conservative and align with most commercial inflatable manufacturer ratings: Pair these terrain ceilings with documented wind speed operating limits so every crew works to the same hard wind limit and shutdown plan.
Power and lighting setups should be planned alongside anchoring so cables do not interfere with tether lines or evacuation paths — see our notes on outdoor event power planning for inflatables for the full setup logistics checklist.
Anchor selection is not glamorous, but it is the difference between a repeat booking and a call from the venue's legal team. Match the hardware to the terrain, respect the wind ceiling, and inspect on a schedule.
We ship every commercial inflatable with a terrain-specific anchor pack — beach spirals, grass stakes, ballast bags, or deck T-rings — sized to the unit's footprint and your site's wind exposure. Browse our obstacle course catalog and request a terrain-matched anchor kit quote.