Inflatable Setup Crew Training: A 5-Step SOP for Commercial Installation
Every rental company that scales past a single truck hits the same wall: setup quality drops the moment you stop personally supervising every install. New hires improvise, veterans cut corners on familiar sites, and one missed anchor turns into an insurance claim. The fix is not more talent — it is a written SOP any five-person crew can execute identically.
This is the standardized 5-step procedure for commercial inflatable installation. It assumes a five-person crew, defines role assignments and time budgets, and includes training milestones so you know when a new hire is ready to advance. Total install window: 55 to 70 minutes plus 45 to 60 minutes for teardown.
Step 1: Site Assessment (10-15 minutes, 1 lead)
The crew lead walks the site alone before anything comes off the truck. The goal is to catch deal-breakers before you have an inflatable half-rigged and a customer watching. Five things get checked, in order:
- Ground type and slope. Grass, concrete, decking, or sand each demand a different anchor pack. Slope must be under 5 degrees — anything more puts uneven load on seams and creates a fall hazard. Check drainage if rain is in the forecast; standing water under a blower intake will fry the motor.
- Wind speed. Take a handheld anemometer reading and check the forward forecast. Abort the install if sustained winds are forecast above 12 m/s. Do not negotiate this with the customer — your manufacturer rating and your insurance policy both depend on it.
- Power source. Confirm voltage, breaker amperage, and distance to the nearest functional outlet. Bring your own surge protector; never assume venue power is clean.
- Overhead clearance. Minimum 1 meter above the tallest inflated point. Tree branches, awnings, and string lights are the usual offenders.
- Documentation. Photograph the site from four corners and sign the assessment sheet. This single habit has saved more insurance claims than any other piece of paperwork in the industry.
The most common SOP failure is skipping Step 1 at repeat venues — "we know this site." Sites change: new patio furniture, a freshly seeded lawn, a new overhead cable. Overlooked changes are the leading root cause of incident reports. Repeat venues get the same walk-through every time. And because conditions shift even mid-event, every crew should pair the site walk-through with a wind speed shutdown protocol so they know exactly when to evacuate and deflate.
Step 2: Tool and Material Inventory Check (10 minutes, 2 crew)
Two crew work the truck while the lead finishes Step 1. They are confirming, not searching — a missing anchor pack discovered now is a 20-minute supply run; discovered at minute 40 it is a canceled event.
- Unit-specific anchor pack, matched to the terrain finding from Step 1 (stake set for grass, sandbag set for concrete or decking, weighted plate set for sand).
- Primary blower plus backup power cord, surge protector, and — for any unit running more than two hours — a backup blower on the truck.
- Repair kit within arm's reach of the lead: vinyl patches, two-part adhesive, scissors, valve plugs.
- Safety perimeter equipment: cones, rope, signage, and a lifeguard chair if the unit is a water attraction.
- Two-way radios, minimum two units, so the lead and the anchor pair stay in contact during inflation when verbal range drops.
- Printed sign-off checklist taped to a clipboard. The lead initials each line.
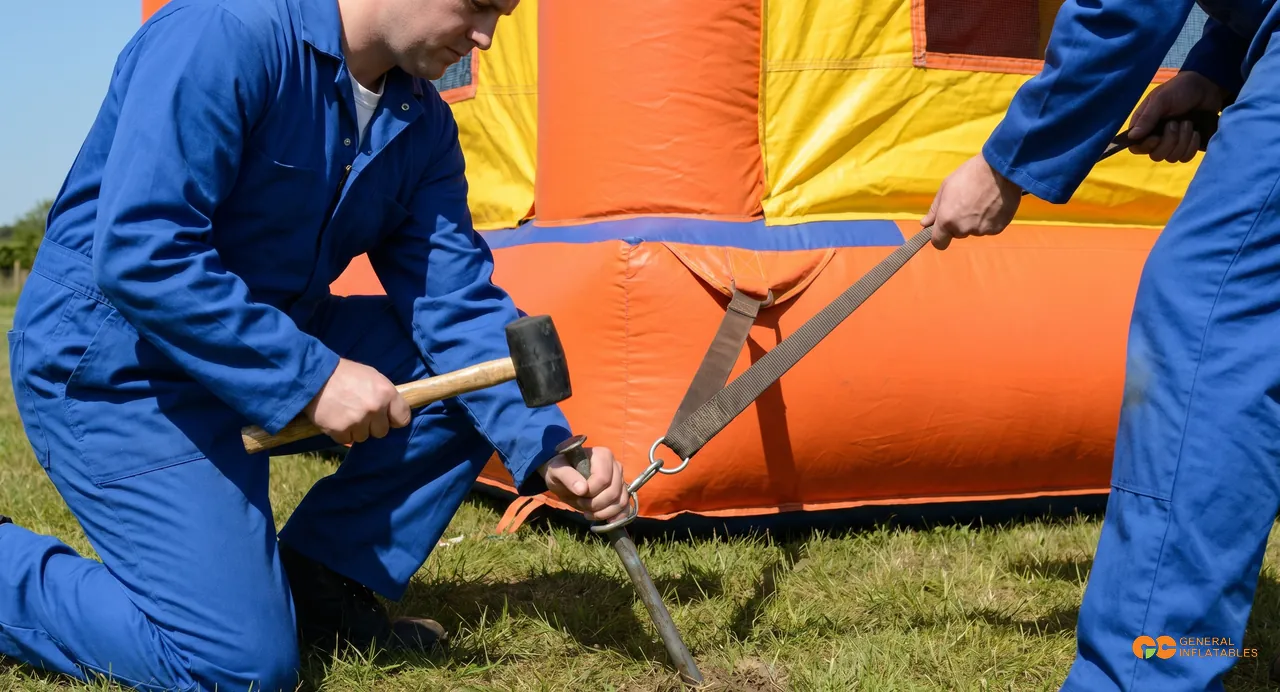
Step 3: Inflation and Anchoring in Parallel (20-30 minutes, 4 crew)
This is the step where untrained crews lose the most time and create the most risk. Inflation and anchoring must run in parallel, not sequentially. The single most dangerous shortcut in this industry is inflating fully before placing anchors — a 10-minute time saving that has flipped units in moderate gusts.
Role assignments for the four-person inflation team:
- Lead (1): positions the inflatable on the footprint, supervises inflation rate, calls the anchoring sequence.
- Blower tech (1): connects the blower, monitors inflation pressure, watches the backup cord.
- Anchor pair (2): installs perimeter anchors simultaneously on opposite sides as the unit rises. Anchors must be engaged and tensioned at 50% inflation — not after the unit is fully up. This rule alone prevents wind shift incidents.
- Safety tech (1): sets the cone-and-rope perimeter, posts signage, drafts the guest safety briefing.
Setup time varies sharply by unit type. A standard bouncer — the simplest geometry — inflates and anchors inside the 20-minute end of the window; our commercial bouncer line is sized to fit this profile for crews still learning. Water slides add 8 to 12 minutes for hose plumbing, pump priming, and splash zone marking, and our water game inflatables include the plumbing fittings in a labeled bag to keep that overhead predictable. Multi-section obstacle courses sit at the long end of the range — figure 45 minutes for a four-section commercial obstacle course because each section anchors independently. Build these unit-specific time budgets into your crew dispatch so the schedule does not assume every event is a bouncer. For anchor selection rules by terrain, our team's reference notes are in this guide to terrain-specific anchoring.
Step 4: Safety Test and Customer Sign-off (15 minutes, 2 crew)
Two crew run the safety check while the rest stage teardown tools or prep the next event. This step is non-negotiable even on rush schedules — every skipped sign-off turns into a refund dispute or liability question.
- Pressure check. Walk the perimeter looking for taut surfaces with no soft spots. Press each chamber by hand.
- Weight test. One crew member jumps in each chamber to confirm no seam stress.
- Customer walk-around. Show the customer or venue representative where anchors are placed, where the blower is located, how to shut it down in an emergency, and what the rider rules are.
- Final inspection sheet. Signed by both the crew lead and the customer rep. This is the document your insurer will ask for first.
- Timestamped photo before any guest steps on the unit. Match the timestamp to the sign-off sheet — the downstream value of this single photo in claim disputes is covered in our note on insurance documentation for rental operators.
Step 5: Teardown and Inventory (45-60 minutes, 4 crew)
Teardown is where damage gets hidden and inventory gets lost. Both cost real money and both are preventable with a fixed sequence.
- Pre-teardown inspection. Walk the unit before deflation, photograph any new tears, scuffs, or stains. New damage discovered at the warehouse with no event-end photo becomes a "we don't know who broke it" argument with the customer.
- Never teardown with guests nearby. The unit footprint plus a 3-meter buffer must be clear before the blower goes off. This is the fourth most common SOP failure point and the one most likely to involve a child.
- Controlled deflation. Open the primary valve and let the unit settle. No crew member walks or jumps on the unit to speed deflation — this is how seams tear at the corners.
- Fold pattern. Each unit type has its own pattern; use the printed card in the storage bag and do not improvise.
- Anchor recovery and count. Every anchor goes back in the labeled pack and the count is logged on the event sheet. Lost anchors are the single largest line item of preventable inventory loss across the industry.
- Truck packing. Heaviest items at the bottom, anchor packs in their own bin, blowers strapped upright.
- Five-minute crew debrief. A standup at the truck before driving off: what went well, what got missed, what to flag for next event. Log it in the event notes.
Training Milestones for New Staff
The fastest way to ruin a new hire is to put them on anchors during their first event. The fastest way to lose them is to keep them shadowing for two months. Use this progression as your default.
- Week 1: shadow only. No hands on the equipment. Carry the clipboard, mark the inspection sheet, learn the vocabulary.
- Weeks 2-3: anchor pair role. Lowest operational risk, highest repetition, builds terrain literacy.
- Weeks 4-6: blower tech. Technical but supervised, introduces electrical and pressure judgment.
- Week 8 and onward: safety tech. First role that carries direct responsibility for guest safety.
- Lead position: minimum 3 months of tenure and 30 events logged. No exceptions for staffing emergencies — an underqualified lead is how the worst incidents happen.
The Four SOP Failure Points to Watch
Every post-incident review surfaces the same four shortcuts: skipping Step 1 at familiar venues, inflating before anchoring to save 10 minutes, skipping customer sign-off on rush events, and starting teardown while guests are near the unit. If your lead cannot recite them on demand, they are not ready to lead.
A written SOP turns crew quality from a hiring problem into a training problem — the difference between scaling and staying stuck at the size the owner can personally supervise.
Onboarding new crew? Order with our setup training pack.
Every commercial unit ships with a per-product setup video, role-card laminates for crew briefing, and a printable inspection checklist sized for clipboard use. Browse our combo inflatable line and request a crew-training documentation pack.